
Astavakrasana
Oh arm balances. How I love thee.
Arm balances require the combination of core engagement (including uddiyana and mula bandhas, arches of the feet and inner thighs), open hips and a bit of arm strength. It's very rare that I am unable to get into an arm balance because my arms aren't strong enough. This work comes from deep inside.
When I approach an arm balancing sequence, I plan accordingly. In an arm balance class, we would do abdominal strengthening and finding the core, mula bandha work, and a lot of hip opening. The additional work necessary for astavakrasana is twisting. Your torso ends up rotated almost 90 degrees in the final posture.
Here are some sequencing ideas for how to make your way to this lovely arm balance.
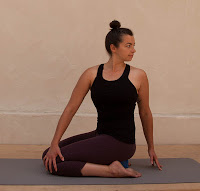
1. Simple twist
Sit on a block (or two if your quads are tight) with your feet hugging in toward your hips. Check that all ten of your toes are pointing straight behind you.
Inhale to lengthen your spine and exhale to begin twisting. Use your opposite arm crossing the midline as leverage to help you twist deeply. Wait for the breath and only twist as your spine will allow. As you exhale, pull the low belly back toward the spine and notice if you have more twisting capability.

2. Vadrasana with Garudasana arms
Come back to center and re-lengthen out through the spine. Wrap your right elbow over your left and try to wrap your wrists and palms together. Isometrically press your palms and arms together to engage the arms and open the shoulders. Take 5-10 breaths on both sides.

3. Balasana with twist
Begin here in child's pose. Let the hips settle back toward the heels. Inhale to lengthen out through the spine and exhale to twist the torso to the right. Plant your left elbow to the mat and stack your palms. Use the connection of your elbow and shins on the mat to twist. Take 5-10 breaths and switch sides. Take several breaths in the center and note the difference between the two sides.

4. Malasana
From child's pose, plant your hands under your shoulders and start to walk your hips back and your heels down. Try to keep the big toes touching. Your heels may not touch the ground which is fine. Hug your knees in toward your outer armpits and soften and ground through the hips. Press your palms together and extend your arms forward. Try to send the arms forward equally to the hips lowering. This will help your balance. Find the breath.
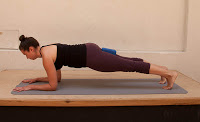
5. Plank variation
Walk your hands forward and place your elbows under your shoulders. Lengthen out through the legs and come on to your tip-toes. Curl your pubic bone toward your face and lower your hips. You should be one straight line from crown of the head to the heels. Fire up your thighs and draw the belly back toward the spine. Release any tension in the neck/shoulders. Breath?
You can release your knees to the mat if legs up is too difficult.

6. Tadasana with strap and block
If you don't have a strap available, a block will suffice. Bring the block up between the thighs as high as possible. Wrap your strap around the block and tighten. Ground through the feet and lift your arches. Draw muscle energy from the inner edge of the feet all the way up to the inner groin. Continue to draw up though the pelvic floor and low belly. Make the legs really strong and bring the head in line with the spine.

7. Standing Twist
Shift weight into your standing leg. Again, lift muscle energy up through the leg by lifting the arch of the foot and following the line upward. When you are balanced, lift your other leg to a 90 degree angle. Flex that foot and bring your opposite hand to the outer knee. Use the hand at the knee as leverage, lift out through the torso with an inhale and exhale to twist. The extended arm is the final step and is pretty useful for balance. Take several breaths and do the second side. Pause in tadasana in the center and breathe.

8. Anjaneyasana with Twist
From downward dog or table step your right leg forward. Tuck your back toes under and send your back foot another several inches behind you. Lower your left leg to the mat and untuck your toes. Bring your head in line with your spine and soften and ground in the hips. Lengthen out through the spine. Feel the breath as the belly moves into the thigh.

When you are ready, move your left hand to your inner right foot and begin to twist to the right. I like to use my right hand to press my right knee in toward the midline at first and then extend the arm.
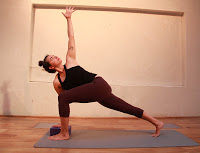
9. High Lunge with Twist
You can transition directly into this high lunge from your low lunge, or step back and rest in a neutral position. Make sure that your ankle is directly below your knee. Lift the arch of your front foot and draw muscle energy up through the inner leg. Make your back leg really strong and lengthen out through the spine. Place your hand to the floor or a block at your inner front foot and begin to twist toward your front knee. The knee will want to pop out to the side—keep drawing it in toward the midline.

10. Supta Gomukasana
Lie on your back and cross one knee over the other. Reach for your opposite feet. Curl the outer edge of the feet toward each other and make them very strong. Pull the feet toward your face. Notice if you create any tension in the neck and shoulders and try to release. Take several breaths here and do the second side.
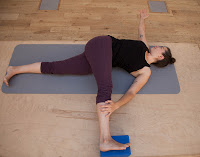
11. Reclining Twist
Lie on your back, bend your knees and plant your feet. Lift your hips up a couple inches and move your entire pelvis 3 inches or so to the left. Extend your right leg on the mat, draw your left knee in to your chest and across the midline. You can work with a bent left knee or a straight left leg. Either way, place it on the block and soften your left shoulder down toward the mat. Feel your belly pressing into your thigh as you breath. Do both sides.
12. Hip opening into Astavakrasana

Sit with your legs long. Draw your right shin in toward your chest and place one hand to your knee and the other to your foot. Rock your shin back and forth, opening your hip. When you're ready, reach for the outer edge of your right foot and try to pull your knee toward the mat behind you. Keep the knee hugging into the midline. The next step is to hook the knee to the top of the shoulder.


Plant your hands firmly and start to lift your hips off the mat. Hook your left ankle over your right ankle. This should help you get some lift. Flex the feet a lot and squeeze the inner thighs toward your shoulder and arm. Keep pressing and engaging through the core as you start to tip forward.

And you're in!
End with savasana with the knee propped up on something (a blanket roll-up or bolster). Feel the breath and release.

